
Happy Labor Day!
Today is the unofficial first day of fall, pools close, splash parks turn off the water, and all the stores bust out their Halloween and Christmas decor...
No 90 degree weather is going to discourage my excitement for fall, and to prove it I whipped up this cozy, comfy, crocheted cowl!

Doesn't this inspire you to buy a tall pair of brown boots to go with it?
No? Just me then :)
I actually began this cowl last Spring, but lost motivation as the weather grew warmer, and thus it sat unfinished until the other day when Gianna pulled it out of my project basket...


Looking like this...sigh
So step one for me was to untangle the yarn and wind it into a ball
Thank you Gigi! :)

Ok, lets get started.
This cowl is a great project for beginners and I will walk you through it step by step!!!
You will need a skein of Caron Simply Soft yarn in your choice of color, and a size K crochet hook.

The basic "formula" for this cowl is 38 stitches wide and 62 rows long.
The stitch is a back loop double crochet.

Where you push the hook through the back of the stitch instead of through the entire stitch.
And it will look like this...

NOTE: I created step by step instructions with pictures for beginners, if you are not a beginner you may skip Parts 1 and 2 and go straight to Part 3!
Part 1: Creating a Chain!
To begin you will need to create a chain of 40 stitches

Wrap your yarn around your hook twice so that it looks like this making sure that the end of the yarn is at the blunt end of the hook.

Now pull bottom yarn over the hook

The crisscrossed yarn creates a loop around the hook.
Now wrap the yarn around the hook above the loop you just created, like so...

And pull the loop over the yarn you just wrapped...

To create another loop which should look like this...

Ok, now grasp the short end of the yarn (pictured on the right) and pull it tight so it looks like this...

Perfect, now you can begin chaining those 40 stitches!
Just continue to wrap the piece of yarn attached to the skein (pictured on the left) around the hook above the loop, pull the loop up and over the wrapped yarn and repeat...

40 times :)
Part 2: The Building Your Rows!
Ok, now for the return trip...
Chain 3, in addition to your original 40, wrap the yarn around the hook (this is called yarning over) and push the hook through the back of the 6th stitch.
Say What?!

Every time you turn around you will chain 3 and skip 2, this will help to keep the shape of the cowl.
Remember to yarn over (wrap the yarn around the hook) before you push the hook through the back of the stitch!


This creates 3 loops on the hook, now wrap the yarn around (yarn over) one more time...

It should look like this.
Now pull the middle 2 loops over the wrapped yarn and hook...

You should now have two loops on the hook.

Ok, now yarn over one more time.

And pull the bottom two loops over the wrapped yarn and you will be left with one loop on the hook!

Yay! Now repeat the process all the way across!
Remember to chain 3 and skip 2 at the end of each row!

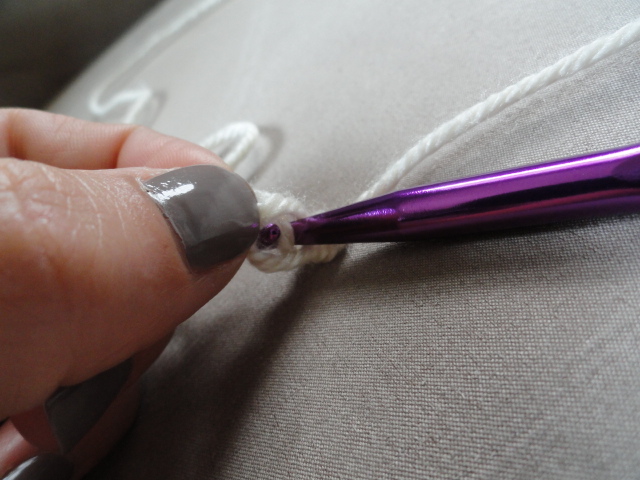
To finish it, pull your final loop out like this.

Cut your yarn leaving a long tail.

Thread the end you just cut through the loop...

And pull it tight!

It should look like this!
Part 3: Putting it all Together!
Now all we have to do is sew together!

Fold your piece in half and line up the ends.

Now take the long end of yarn, and thread it through a yarn needle (a needle with a large eye)

Use your needle to sew the two sides together. Stop when you reach the halfway point.

Tie off and clip the rest of your yarn at this point.
Now for the button.
Take the remaining dangling piece of yarn

And using your needle, sew it toward the center of the flap.

Now sew on your button.

Ok, here is the cool part...
Remember how you chained 3 and skipped 2 every time you turned around?
Well, the button will fit through the little hole that technique created!!!


And you did it!!!


Now I just need those boots...and maybe a pumpkin spice latte...I love fall!

Hmmm....I will have to see if I can finally figure out how to crochet from your tutorial! You made it look easy! I couldn't get past the chain last year!!!
ReplyDeleteIt is easy! Let me know if you have any questions, and take a picture of it if you finish!
DeleteThe instructions make sense. I might have to try it!
ReplyDeleteAwesome! If you do, send me a picture!
DeleteQuick question...
ReplyDeleteHow much yarn did you use, and what was the final dimension of the scarf before you stitched it?