Ok, I know this isn't a clear picture of the pajama top, but I couldn't resist that laughing face!
This little pajama top is super cute, super comfy, and super easy to make!
I created my pattern by deconstructing a pair of Gigi's existing pjs. I made some adjustments to the top because these pjs didn't button in front, and I wanted to add a little length to the top.
To simplify matters, I intend to post my pattern so that it can be printed very soon!
It basically came down to 4 pieces, two sleeves, one back piece, and two front pieces.
Step one was to zig zag the inside edges of the two front pieces. Eventually, this is where the top will button closed.
I then folded the finished edges over by 1/2 inch and pressed them.
Now, you just want to sew them in place.
So now, with right sides facing, you want to line up the shoulders, pin and sew using a 1/4" seam allowance.
Ok, Bias tape time!!!
We used store bought bias tape for the shorts project, but here we will be making our own!
Cut a strip that is 2 1/2" wide and long enough to go all the way around your collar with a little to spare...mine was about 16"
Fold your piece in half hot dog style, and press.
Now, open it up and fold each side in to the center.
Ok, once that's done, fold the piece in half again and press.
It's that easy!
Ok, back to work...
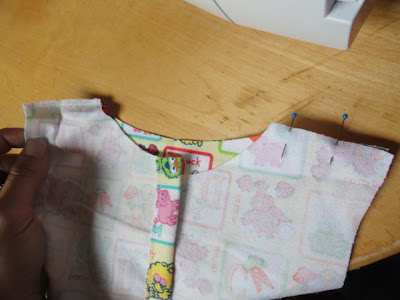
starting on one side of your collar, tuck the bias tape end under and begin pinning it in place all the way around your collar.
Next, sew the bias taped in place.
Sew along the bottom edge of the tape using a 1/4" seam allowance, and make sure to keep it all together!
Whew!
Ok, sleeves, starting at the bottom of one arm pit, and with right sides facing, pin the sleeve to the shirt.
If you find that it doesn't match perfectly and you have a little extra fabric,
simply pucker the excess fabric at the top of the shoulder to create a sweet little poof!
You're almost there!
See it even looks like a shirt...sort of!
Turn the shirt inside out and pin all the way from the wrist to the hem.
Now, sew using a 1/4" seam allowance.
To hem the sleeves, fold the wrist under twice, and sew it in place.
This is a bit tricky because it is such a small circle, but be patient and gentle and it doesn't take long!
Finish the bottom hem the same way!
I used buttons for this top, they are colorful and fun, but sewing them on can be a pain so next time I may just go with snaps!
In any case, if you decide to go with buttons, line them up on your shirt where you want them to go, and make a small mark.
Then haul out your button foot and your manual and start sewing button holes!
Once the button holes are sewn, you will need to line up the shirt opening and sew your buttons in place.
Pair it with those super simple pj pants, and you're done!
No, that's it, there's nothing else up my sleeve today!


What a fun set of PJs!!!
ReplyDeleteHAPPY BIRTHDAY, Miss Mega-Creative Busy Person!!!! We're so proud of you!
ReplyDelete