Today's project is a slight variation on the Gigi skirt!
 |
| Remember this? |
You may have noticed that several of my posts lately have been birthday gifts. The birthday extravagannza begins in August and doesn't ease up until after Christmas, which is an extravaganza all its own, so stay tuned for many upcoming gift ideas!
Today's project was created for one of Noah's preschool friends who is having her 4 year old birthday party tomorrow! I chose the neon polka dot fabric because neon is becoming so popular again...I'm having flashes of my neon paint splattered "New Kid's on the Block" hat...and this little girl is spunky enough to pull it off!
Ok, so like I said, the basic construction of the skirt is almost identical to the Gigi skirt tutorial found HERE. But! I changed a few things because of the difference in the fabrics, and I wanted to share!
So the first difference is that since this skirt isn't being made from jean legs, I didn't need to cut two pieces for the top skirt layer. Simply cut one long piece from each fabric. Make sure they are the same length and that one is wider than the other, like so...
The next difference is the bottom edge. In the Gigi skirt, the bed skirt layer already had a finished edge and the denim just needed a regular zigzag finish. Since this skirt is being constructed of cotton fabric, and I didn't want to hem it because it would affect the movement of the skirt, I needed to finish the edge a little more professionally.
This is the basic zigzag stitch, it finishes the edge so that it won't fray, but it tends to look a little messy.
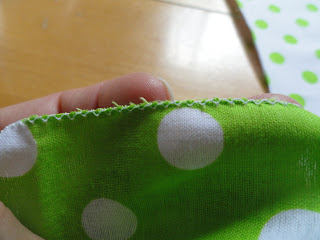
This is the zigzag stitch where I have altered the stitch width. So much prettier, don't you think?
To do this, I selected the zigzag stitch, on my machine it is the #4 stitch, then I used the top right button to adjust the stitch width.
I reduced the width from 1.4 to .5 (not that you can really see it in this picture, but you get the idea.)
The final change I made was to give the waist band a little more flare. Once you have created the casing for the elastic, but before you insert that elastic, top stitch along the very top edge of the waist band.
Once the elastic is inserted, it creates a slight ruffle affect along the top edge of the skirt and it's pretty!
So, there you have it, a few more options to try out!
Now, go get crafty!


No comments:
Post a Comment