Friday, August 31, 2012

Winner Winner Chicken Dinner...or Something Like That!

I love rosemary! 
 One of my all time favorite treats is a loaf of Rosemary Garlic Bread baked fresh at the Trampeau Bakery down the street.  I think I actually consumed an entire loaf by myself the day Gigi was due...note that I said due, not arrived as she chose to delay her arrival by 4 days!!!
 But I also love rosemary on potatoes, and on french fries, and...
on chicken!
Welcome to my Rosemary Chicken with Brown Rice and Roasted Vegetables!
This is a healthy, delicious, and dare I say it, awe inspiring dish!
 The marinade cast of characters!
1/4 cup Olive Oil
2-3 Tblsps of Rosemary
3 Tblsps of White Wine Vinegar
1 tsp salt
1tsp cracked black pepper
Whisk all the ingredients together until you get the swirling vortex of flavor as shown above!
Then simply poor the marinade over 1 pound of chicken, breats or cutlets work best I think, cover the whole thing with foil and refrigerate for a while!
Now lets get those veggies going!  Preheat the oven to 450 degrees, and line a baking sheet with foil, shiny side down.  I don't know if it's true or not, but I've heard that if you put the shiny side up it causes food to cook and burn faster!
 
I use red peppers, yellow peppers, carrots, red onions, and red potatoes, but just about any vegetable will do.
Simply cut your veggies into bite sized pieces...
Drizzle it all with olive oil, 1/2 tsp salt, and 1 tblsp of freshly cracked garlic pepper!
Toss things around a bit to make sure everything is evenly coated and pop it in the oven for 10 to 15 minutes.  When the timer goes off, give it a stir and put it back in for another 10-15.
Get that brown rice going, 2 cups rice to 3 cups water in a cooker.
And we're ready to start grilling!  Heat a grill pan, or an actual grill, on medium high.  It should sizzle when the chicken touches the pan. 
Grill for about 4-5 minutes on each side for cutlets, a little longer for breasts.
You will be shocked at how  bright and flavorful this simple healthy meal is!


Thursday, August 30, 2012

Penny for Your Thoughts?

You all know me as a crafty mother of two, but you may not know that I am also...
a BZZ Agent! 
I am a member of www.bzzagent.com and as such I get to try new and interesting products for free!  Basically, I try the product, and share my opinion about it with others.  Generally I'm given coupons or samples to share and I try to get other's feedback about the products as well.
So, my latest Bzz campaign is Dentyne Ice Split2fit packs!
My Bzz kit contained two generous multi-packs of the gum to try and to share.
So I tried some, and now I'm sharing...my opinion!
 Now, I've always been a fan of Dentyne Ice gum, it tastes good, and it lasts long so I buy it occasionally.
The difference here is not the taste, but rather in the packaging...

 The split2fit concept is that you get two slim packs of gum instead of one bulky pack and you get to take one and leave one.  Also, since the pack is so small and slim it will fit almost anywhere.
(Took these myself, thank you very much!)
And it does. 
But I'm a diaper bag wielding mother of two so the size of my gum package is never an issue for me!
See it fits!
The campaign seems to be geared at a...gasp...younger generation, and it's mostly wasted on me.
 I think it's a cool concept, and I like that this pack has 16 pieces instead of the traditional 12, but I wouldn't buy it based on the new packaging.
 
So that's what I think...now what do you think?
Do you chew Dentyne?
Does their new split2fit packaging appeal to you?
Leave a post and give me your opinion!


Wednesday, August 29, 2012

All the Little Things!

Last week it was fall, this week, summer came back!
So today was all about the simple things!

 
Like Coffee!
 
or Gigi's shadow!
 
Like Noah saying, "I picked these flowers for you mommy because you're so loved!"
 
or the sprinkler!
 
and the garden...
...ok, actually, Noah and Joshua planted the garden, I, the plant assassin, was involved only as a bystander!
 
 
But look!
 
 
And another one!  You have no idea how excited these little squash...squashes? make me!  This garden began as seeds, we didn't even use starter plants, and now we have two squash!!!
 
The kids weren't quite as excited as I was.
 
 Little things like dandelions...
 that don't reconnect themselves to the ground when you drop them!
 
 
Like one million thorns in your shoe but none of them poked through!!!
 
 And...did I mention?
The Coffee!!!


Tuesday, August 28, 2012

Good Morning! What's for Dinner?


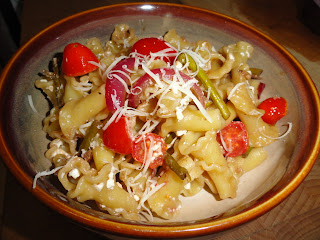
Pasta is one of my very favorite things!  I love the way you can toss just about anything with pasta and it's delicious...there are exceptions of course, and while I have never made a truly bad pasta dish, some recipes are definitely more successful than others!  The "Darn Good Pasta" dish was so good that I actually wrote the recipe down!   
 
 
MMMMM, creamy feta melds together with the sweet and tangy balsamic vinegar which plays off of the freshness of the asparagus and the flavor of the red onions which all circles back to the sweet burst of the tomatoes...Too much Food Network?  Then let me just say...SHAZAAM!
 
Ok, here we go:

 
Ingredients:
Fresh asparagus
grape tomatoes
1/2 red onion
3/4 box of Campanelle pasta (penne will work too, Noah chose the Campanelle, he said, "I know!  I will call this Flower pasta!"
2-3 tbsp Good Balsamic vinegar (Don't skimp here, quality of the vinegar affects the taste!)
3-4 tbsp Olive oil
1tsp kosher salt
1 tsp pepper
1/2 tbsp butter
2-3 garlic cloves
A Splash of white wine
 
Fill a pot with generously salted water.  While that is coming to a boil, heat the olive oil on medium heat.  Take the Garlic cloves and if you've ever watched Giada, you know how to get that "garlic armour" off.  Smash it with the flat side of your knife!  Now to chop the garlic...
 
If you don't have one of these nifty tools, you should get one, it takes all the time and annoyance out of chopping garlic! And the best part is...
 
 
The kids can help!!!


So that was a long journey through the simple process of garlic chopping, now back to cooking!
 
Toss the garlic in the heated oil and stir for about a minute.
Isn't food pretty?! 
Slice your onion into long thin strips and cut the asparagus into bite sized pieces, toss both into the garlic and oil.  Stir for another minute or so.
Now add the balsamic vinegar and the salt and pepper and the best part...
The wine!
This is where you will add your 1/2 tbsp of butter, this will help smooth out all the flavors and really bring it all together, Do Not Skip This Step!
Now let that cook together on medium heat for about 5 minutes stirring occasionally. 
Cut the tomatoes in half and add them about a minute before your pasta is ready.
Drain the pasta and toss it in with everything else!
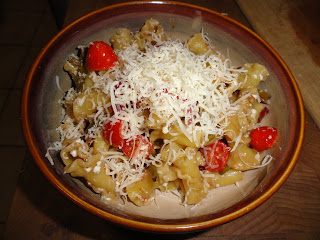
Toss in some feta and top it off with a little freshly grated Parmesan!
Ok, lets be serious...
And THAT is how it's done!


Monday, August 27, 2012

Variations for the Gigi skirt

 
Today's project is a slight variation on the Gigi skirt!
 
Remember this?
You may have noticed that several of my posts lately have been birthday gifts.  The birthday extravagannza begins in August and doesn't ease up until after Christmas, which is an extravaganza all its own, so stay tuned for many upcoming gift ideas!
 
Today's project was created for one of Noah's preschool friends who is having her 4 year old birthday party tomorrow!  I chose the neon polka dot fabric because neon is becoming so popular again...I'm having flashes of my neon paint splattered "New Kid's on the Block" hat...and this little girl is spunky enough to pull it off!

Ok, so like I said, the basic construction of the skirt is almost identical to the Gigi skirt tutorial found HERE.  But!  I changed a few things because of the difference in the fabrics, and I wanted to share!

So the first difference is that since this skirt isn't being made from jean legs, I didn't need to cut two pieces for the top skirt layer.  Simply cut one long piece from each fabric.  Make sure they are the same length and that one is wider than the other, like so...
The next difference is the bottom edge.  In the Gigi skirt, the bed skirt layer already had a finished edge and the denim just needed a regular zigzag finish.  Since this skirt is being constructed of cotton fabric, and I didn't want to hem it because it would affect the movement of the skirt, I needed to finish the edge a little more professionally.
This is the basic zigzag stitch, it finishes the edge so that it won't fray, but it tends to look a little messy.
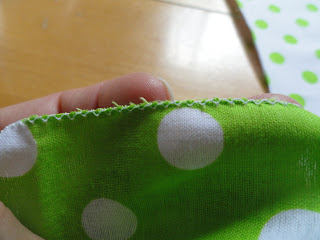
This is the zigzag stitch where I have altered the stitch width.  So much prettier, don't you think?
To do this, I selected the zigzag stitch, on my machine it is the #4 stitch, then I used the top right button to adjust the stitch width.

I reduced the width from 1.4 to .5 (not that you can really see it in this picture, but you get the idea.)
The final change I made was to give the waist band a little more flare.  Once you have created the casing for the elastic, but before you insert that elastic, top stitch along the very top edge of the waist band.
Once the elastic is inserted, it creates a slight ruffle affect along the top edge of the skirt and it's pretty!
So, there you have it, a few more options to try out! 
Now, go get crafty!